Easy Microwave Spiralized Potato Ramen {gluten-free, vegan, nut-free, dairy-free, vegetarian}

As I mentioned in the “Why Gluten Free?” section of my blog, I was diagnosed with lupus during my senior year of college and have been working on managing it to the best of my ability for the past four years. While I’ve been extremely lucky and have seen a drastic improvement in my health since my initial diagnosis, it still will pop back up when I least expect it, usually in the form of migraines, severe joint pain and overwhelming exhaustion. Unfortunately, some days I push my body a little too far and will regret it the next morning when I wake up to flare ups of my lupus symptoms. For me, these mini-flare ups can last weeks, and pretty much mean that during any “free-time” I’m asleep (and “non-free-time” I wish I was asleep), which drastically cuts back on my cooking and food prep time.

IMG_4915 2

When I was first diagnosed with lupus, I essentially only left my dorm room to go to class, and would often opt out of walking to the dining hall for meals. This resulted in me eating a lot of contraband peanut butter and jelly sandwiches that my friends stole for me from the dining halls, and a disgusting amount of ramen noodles from the vending machine outside my room. Ramen became my quick and easy comfort food to keep me going during those periods of exhaustion when I didn’t have enough energy for anything else except binging Netflix.

Since then, I have opted to follow a gluten-free, vegan diet which has eliminated ramen from my life. I’m also a lot more aware of how important continuing to eat healthy and exercise is, even when I’m feeling my worst. Despite this, something about flare ups leave me missing that quick and easy comfort food on days when I am just too exhausted to spend time prepping meals. The more I thought about it, the more I realized I needed to come up with an easy alternative for myself, and my Easy Microwave Spiralized Potato Ramen recipe was born. It has been the perfect quick and easy meal for me and has been a life-saver during flares. This recipe can really be as easy or as complicated as you want (or can handle, based on exhaustion level) and is so easy to customize based on what foods you have in your house, for when I’m too tired to make it to the grocery store.

IMG_4914

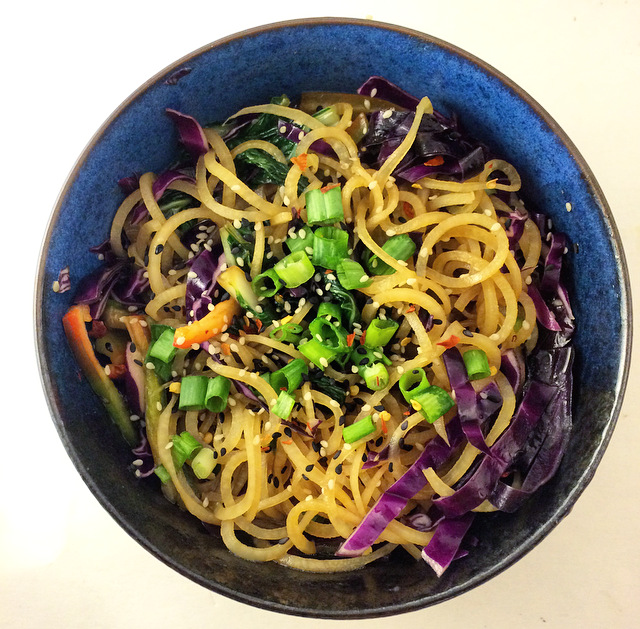
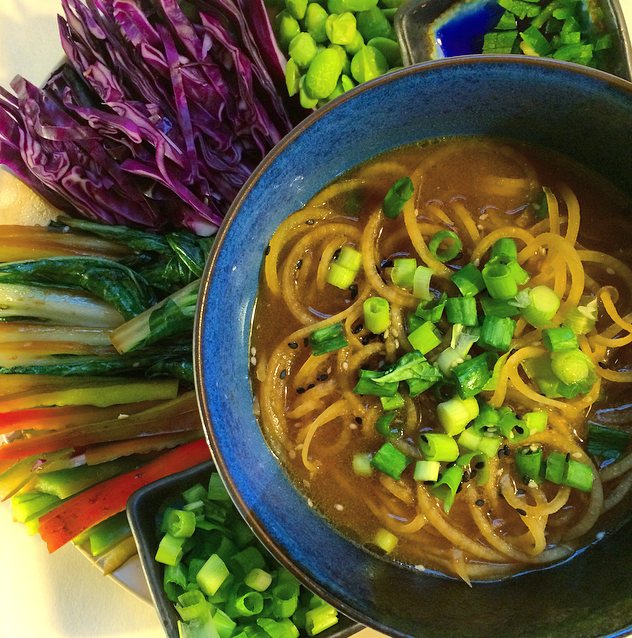
The basis for this recipe is really just using a spiralizer or julienne peeler to make “noodles” out of potato (I highly recommend the spiralizer, it makes this ridiculously easy). After that you just add the potato to your broth of choice, microwave, and season to taste and the job is done! I’ve also been loading mine up with a bunch of extra vegetables, since it makes it a little more interesting, and I’m a bit more aware now of how eating healthier will help me feel better. For this version, I made up a miso broth using miso paste, but feel free to sub in any vegetable based broth that you have on hand!

IMG_4920 copy

Extra veggies will help bulk up your meal and keep the ramen interesting

Recipe

Ingredients:

  • 1 peeled potato spiralized or julienned
  • 2 cups water
  • ½ tbsp miso paste
  • 2 tbsp tamari
  • 1 tsp sesame oil
  • Any mix-ins you have on hand (Possible mix-ins include: scallions, hot peppers, red pepper flakes, baby bok choy, cabbage, sliced peppers, sliced carrots, edamame, tofu, broccoli, mushrooms, peanuts, cashews, onions, curry paste, sesame seeds, etc.)

Instructions

  1. In a microwaveable bowl, combine water, miso paste, tamari and sesame oil (or 2 cups of a vegetable based broth broth of your choice)
  2. Add “potato noodles” from one spiralized (or julienned) potato
  3. Cover the bowl and microwave for ~6 minutes, or until “potato noodles” are softened
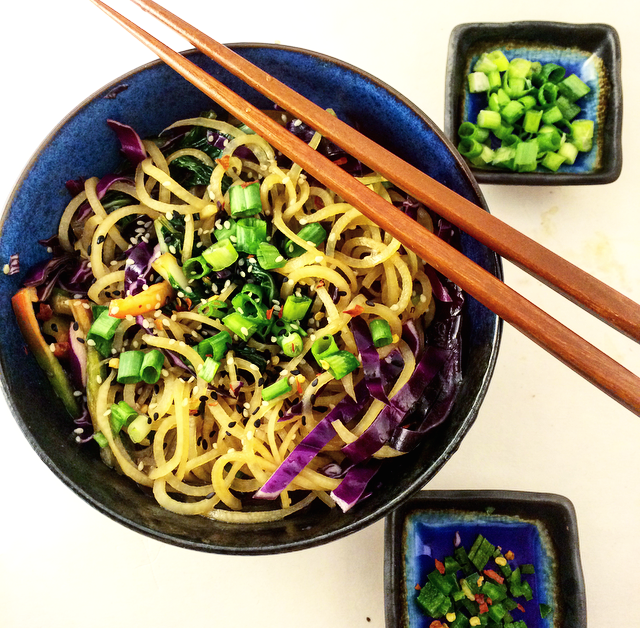
  4. Add any mix-ins you have on hand. For the bowl pictured I used baby bok choy, red cabbage, thinly sliced peppers, thinly sliced carrots, edamame, sesame seeds, red pepper flakes and scallions. You can make it as simple or complicated as you want!
  5. Enjoy lazily while binging Netflix.

IMG_4913 2

Irish Soda Bread


DSC_0932

I started my dietetic internship in January, which means between working in the hospital, commuting and studying I have barely had time to sleep, let alone to cook. This weekend, I finally found myself with a few free hours and decided it was time to stress-bake. With St. Patrick’s Day coming up, I figured it would be a good time to get in touch with my Irish heritage and try to re-create a classic Irish soda bread.


DSC_0031

While gluten-free bread may require a few more ingredients, one plus side is that you don’t have to knead the dough. Normally, kneading dough is essential for making a gluten matrix that traps air and allows dough to rise. Leaving out the gluten means you can skip the extra work of kneading, and you don’t have to worry about over or under kneading your dough.  With this recipe you just have to mix the dough with a spatula until well combined and then throw it in the oven!

Recipe

Dry Ingredients: 

  • 1 cup oat flour
  • 1 cup corn starch
  • 1 cup chickpea flour
  • 1 cup brown rice flour
  • ¼ cup sugar
  • 1 ½ tsp baking soda
  • 1 tsp salt
  • 1 tsp xanthan gum

Wet Ingredients: 

  • 2 cups non-dairy milk  (I used cashew, but almond or soy would work as well)
  • 2 tbsp apple cider vinegar
  • 4 tbsp melted Earth Balance
  • ½ cup raisins
  1. Preheat oven to 375F
  2. Mix together milk and apple cider vinegar and allow to sit for 5-10 minutes
  3. Combine dry ingredients in a large bowl
  4. Add the melted Earth Balance and  milk + apple cider vinegar mixture to the dry ingredients and mix well using a rubber spatula.
  5. Once batter is mixed  add in the raisins and mix until well distributed
  6. Using floured hands (the dough will be sticky) , form the dough into a round
  7. Place the  round on a cast iron skillet (or a regular baking sheet if you don’t have a skillet)
  8. Bake for 40-45 minutes, or until golden brown
  9. Once finished, transfer bread to a wire rack and allow to cool completely before slicing. DSC_0103

Roasted Peach Donuts {vegan, gluten-free, soy-free, nut-free, dairy-free, egg-free}

Roasted Peach Donuts

Learning how to bake while following a gluten-free, vegan diet was a serious struggle for me. I went through trial after trial of different recipes and somehow failed in every way possible. I made cookies that looked good before they went into the oven and somehow flattened into a single rock-hard inedible sheet when they came out. I made cupcakes that were somehow simultaneously burnt and raw. I made breads that were gummy and crumbly at the same time. It was a mess. It took me at least a year to produce anything that was even halfway edible, and much longer than that before I felt confident enough to share my baked goods with other people. It was outrageously disappointing and discouraging and made the beginning of my transition to following a gluten-free, vegan diet very difficult. Eventually, after a lot of failures, I learned the tricks and substitutions that made for delicious gluten-free, vegan baked goods, but it certainly took me a long time.

Roasted Peach Donuts

Two years ago, my mom gave me the cookbook BabyCakes Covers the Classics  and it was a huge part of helping me bake something that was not only edible, but delicious (seriously, I couldn’t recommend their cookbooks enough). After trying donuts at the BabyCakes bakery on a trip to visit my brother and sister-in-law in New York, I decided their donut recipe had to be the first thing I tested out. The donuts came out perfectly, and finally some of that overwhelming discouragement around gluten-free vegan baking was lifted.

Roasted Peach Donuts

After that first success I went on a somewhat obsessive donut-making spree testing out different recipe variations and flavor combinations. Now that I could finally bake something worth eating, I couldn’t stop myself from making batch after batch to make up for lost time. The weirdest thing about it is: before I was vegan and gluten-free, I actually hated donuts. It was definitely a bizarre food group to hate, but up until a few years ago I refused to eat any donuts except for fresh made apple cider donuts. This recipe, and the ability to make fun and unique flavors on my own has helped me to understand the donut hype — and now I can’t get enough.

Roasted Peach Donuts

These donuts utilized some of the farm-fresh peaches from my local CSA box, and when paired with cinnamon created a flavor that perfectly fit these early-fall days. I may have broken my recent rule regarding small portion recipes and no processed sugar, but the outcome was definitely worth it (sometimes you just need to treat yo self). The peach puree allows for a sweet peach taste throughout the donut, while also working as an egg replacer (just like in my Spiced Peach Muffins), and the hand-mashed peach allows for some larger pieces throughout the donut to give it that extra kick of gooey peach taste in every bite.

Roasted Peach Donut


Recipe

Ingredients:
Dry Ingredients:
  • ¾ cup brown rice flour
  • ½ cup brown sugar
  • ½ cup potato starch
  • 1/3 cup garbanzo bean flour
  • ¼ cup corn starch
  • 1 ½ tsp baking powder
  • ½ tsp xanthan gum
  • ½ tsp salt
  • ½ tsp cinnamon
  • 1/8 tsp baking soda
For topping: 
  • 1/3 cup cinnamon sugar
Wet Ingredients:
  • 2 peaches, with coconut oil for brushing
  • 2 tbsp vanilla extract
  • ¼ cup maple syrup
  • 1/3 cup melted coconut oil

Instructions

  1. Preheat oven to 375F
  2. Slice 2 peaches in half, removing the pit.
  3. Place peach halves cut side up in a baking pan, brush with coconut oil and sprinkle with cinnamon.
  4. Bake peaches for 35 minutes.
  5. Remove peaches from oven and allow them to cool.
  6. Reduce oven temperature to 325F
  7. Place 3 of the peach halves in a food processor and puree until completely smooth. Keep one peach half in a separate bowl and mash with a fork by hand, leaving some larger pieces.
  8. In a large bowl, whisk together dry ingredients until well combined.
  9. In a separate bowl combine the roasted peach puree, vanilla extract, maple syrup and coconut oil (leave out the hand mashed peach for now).
  10. Pour the wet ingredients (withholding the hand mashed peach puree) over the dry ingredients and hand mix until thoroughly combined. The dough will be thick and sticky.
  11. Fold in the hand mashed peach puree.
  12. Distribute dough into a well greased donut pan. (This recipe makes 12 donuts. A typical donut pan makes 6, so you will either need to own two donut pans, or make the donuts in two batches).
  13. Bake donuts for 16 minutes, rotating the pan halfway through.
  14. Remove donut pan from the oven and allow to cool in the pan for around 10 minutes.
  15. Remove donuts from pan and place on a cooling rack.
  16. Once donuts are cool enough to handle, coat the donuts with cinnamon sugar (This works best if the donuts are still relatively warm when you are coating them).
  17. Enjoy!

Roasted Peach Donuts

Spiced Peach Muffins {vegan, gluten free, dairy free, soy free}

For me, starting up a new school year wouldn’t be quite complete without a bout of procrastination baking. Baking is definitely my #1 form of procrastination, and has gotten me through many stressful periods of grad school. It is the perfect vice: once I’m done procrastinating, I have a batch of something tasty to stress eat when I realize how little time I have left to finish my homework. I’ll admit it is a pretty messed up system, but it’s worked well for me for the last two years, so it’s only proper that I start off my last semester of grad school the same way.Farm Fresh Peaches

Since my past three CSA boxes have had peaches in them, I’ve been trying to incorporate them into my baked goods before they all go bad (see my previous post for Peach Blueberry Cobbler). This time I decided to go for something I could easily grab in the morning on my way to the gym at 5:15, or take with me to class for a mid-day pick-me-up (because I obviously need one after waking up at 4:45 😴) . These spiced peach muffins were the perfect fit. They pair sweet peach flavors with warm fall spices, a perfect match for these late summer, early fall September days.

Spiced Peach Muffins {vegan, gluten free, dairy free, soy free}

As I mentioned in an earlier post, I’m making an effort to make recipes with smaller yields and less processed sugar and these muffins fit both of those requirements. This recipe makes six medium-sized muffins and contain no processed sugar (they are sweetened with maple syrup and the peaches themselves). Having a smaller yield recipe not only stops me from eating a dozen muffins by myself, it also cuts down the amount I spend on baking supplies (which is going to be essential if I keep testing out new recipes while putting off my school work).

Spiced Peach Muffins

Instead of using applesauce as my egg replacer, like I normally would for muffins, I switched it up a bit and used fresh pureed peach. This really brought out the peach flavors in the muffins, and worked wonderfully at replicating the moisture, structure and texture of a standard muffin. [Similarly to with applesauce, the polysaccharides in the peaches form a starch gel when baked, allowing them to mimic the protein networks formed when eggs are used in baking]. The peach puree allows for the functional characteristics that eggs normally provide, with some additional sweet peachy taste and none of the cholesterol or animal cruelty.

Spiced Peach Muffins 

Recipe

Dry Ingredients
  • 1¼ cup gluten free flour (I prefer Bob’s Red Mill All Purpose Baking Flour)
  • ½ tbsp baking powder
  • ½ tsp cinnamon
  • ¼ tsp ginger
  • 1/8 tsp cardamom
  • 1/8 tsp salt
  • Optional: 2 tbsp chopped walnuts, pecans or crystallized ginger
Wet Ingredients
  • ¼ cup cashew milk (or your dairy-free milk of choice)
  • ¼ cup coconut oil
  • 1/3 cup pureed peach (~1/2 a peach)
  • 1/3 cup maple syrup
  • ½ peach, diced
Instructions:
  1. Preheat oven to 400F
  2. In a large bowl combine gluten-free flour, baking powder, cinnamon, ginger, cardamom and salt.
  3. In a separate bowl stir cashew milk, coconut oil, peach puree, and maple syrup until well mixed.
  4. Pour wet ingredients into the dry ingredients and stir until smooth
  5. Fold in diced peach, and any other optional mix-ins (ex. walnuts, pecans, crystallized ginger).
  6. Evenly distribute batter into a muffin tin (this recipe should make around 6 muffins).
  7. Bake for 18-22 minutes, or until a toothpick inserted into the center of the muffin comes out clean.
  8. Remove muffins from the muffin tin and allow them to cool on a cooling rack
  9. Enjoy!

Spiced Peach Muffins {vegan, gluten free, dairy free, soy free}

Wild Rice Salad (w/ Beans, Potatoes, Pecans, Figs and Sherry Vinaigrette) {vegan, gluten-free, dairy-free, soy-free}

Wild Rice Salad with Fresh Figs

Back to school season is here, which means  a reprieve from the blistering heat (hopefully), my last semester of graduate school, and the promise of pumpkin spice and fresh apple flavored foods in my near future. Unfortunately, it also means exhaustingly long days, hectic schedules and a goodbye to anything resembling free time.

Wild Rice Salad with Fresh Figs

Once September rolls around I am back to leaving my apartment before 6 every morning, and often not getting back until around 10pm. Between classes, getting to the gym, working as a research assistant and getting my homework done, my schedule is pretty much booked solid during the week. Not only does this leave me very little time to cook, it also means I eat almost all of my meals away from home either while sitting through lectures, in my office or while commuting. This means a lot of meal prep over the weekends, and a backpack full of food at all times.

Farm fresh broad beans from my weekly CSA box

Farm fresh broad beans from my weekly CSA box

For my first week of class I decided to make a simple dish using the produce I had left from my weekly CSA box. I needed something that was easy to make, and that I would be able to easily pack as meals on the go. I paired up my farm fresh potatoes and broad beans with some wild rice, toasted pecans, fresh figs and a sherry vinaigrette inspired by a dish my sister-in-law has made me before. It was a perfect combination of flavors, and lasted well in the fridge all week to help get me through my long first week of classes.

IMG_3813

I’ve been kind of obsessed with figs recently, and thought they’d be a perfect sweet addition to this rice salad, but feel free to use dried cranberries or another sliced fruit instead!

This recipe allowed me to mix a bunch of different ingredients I had around the house, and is really very versatile.

  • Don’t have pecans? Try roasted walnuts, or slivered almonds, or omit the nuts all together.
  • Don’t have broad beans? Try green beans, or snap peas.
  • Don’t have figs? Try dried cranberry, or sliced pear, or sliced apple

It’s an easy dish to throw together with delicious results, even during those busy weeks.

Wild Rice Salad with Fresh Figs

Recipe

Ingredients:

Wild Rice Salad
  • 1 cup dry wild rice, prepared as instructed on package
  • 1 lb flat beans, trimmed and cut into ~3” pieces
  • 5 small potatoes, cut into 1” cubes
  • 2 tbsp olive oil
  • 3 cloves garlic, chopped
  • 5 figs, chopped
  • 1/3 cup pecans
  • ½ tsp salt
  • ½ tsp pepper
Sherry Vinaigrette:
  • 3 tbsp sherry vinegar
  • 1 tbsp oil
  • 2 small clove garlic, finely minced
  • 1/8 tsp salt
  • 1/8 tsp pepper

Instructions:

  1. Preheat oven to 400F
  2. Toss potatoes, beans, garlic and olive oil in a large bowl until evenly covered, sprinkle with salt and pepper.
  3. Distribute the vegetables evenly on a baking sheet and cook for around 35 minutes, or until the potatoes start to get crispy.
    • While the vegetables are roasting, prepare the dressing by whisking together the sherry vinegar, olive oil, garlic, salt and pepper in a small bowl.
  4. Remove the baking pan and lower the oven temperature to 350.
  5. Spread pecans on a parchment paper lined baking sheet, and allow to toast for 10 minutes.
  6. In a large bowl, combine the cooked wild rice, roasted vegetables, chopped figs, and toasted pecans.
  7. Drizzle dressing over the top, and toss until well distributed
  8. Enjoy! (or in my case, pack up into individual sized portions, and enjoy throughout the week at my desk or during lectures)

Wild Rice Salad with Fresh Figs

Peach Blueberry Cobbler {vegan, gluten-free, dairy-free, soy-free}

So much produce for only $22!

As I mentioned in my last post, I’m making an effort to design new recipes using the fresh produce from my weekly CSA box. After using the eggplant to make eggplant bacon, I had my eyes on something a little sweeter and went straight for the peaches. I may have gone a little overboard baking this weekend and I know there are going to be more peaches in my box next week, so expect a few more peach-based recipes in the near future. My first creation was a vegan, gluten-free version of a classic peach cobbler, with a few fresh blueberries mixed in.

Peach Blueberry Cobbler

Since I’ve been baking a lot, I keep ending up with a surplus of baked goods. While this doesn’t seem like a big problem, it is a little troubling when I find myself with three full batches of peach-based baked goods and a huge sweet tooth.

In order to combat this I’ve been trying to:

  1.  limit the amount of processed sugar in my recipes whenever I can. This way I feel a little less guilty about  having these foods as my snacks during the day.
  2. design recipes with a smaller yield so that I don’t end up with a kitchen (and stomach) completely full of baked goods. Most often when I’m baking I do it as stress relief, or procrastination and I’m not actually in need of a huge supply of sweets. Lately, I’ve been making half, or even quarter portions of recipes that allow me to get the stress relief of baking, the fun of testing out new recipes, and the ability to feed my cravings, without having a excess of food around that I won’t (or shouldn’t) eat all of.

Peach Blueberry Cobbler

This recipe paired fresh, local peaches and blueberries with a “buttery” biscuit topping, perfect for enjoying on these last (and excessively hot) days of summer. I cut the recipe down to two single-serving portions, but it can easily be doubled or tripled if you have more people to serve. It also contains no processed sugar, and uses only maple syrup as a sweetener, so you can feel a little less guilty when you have cobbler for breakfast (at least that’s what I’m telling myself).

Peach Blueberry Cobbler

Recipe:

Ingredients:

For the fruit filling:

  • 1 peach, sliced
  • 2 tbsp blueberries
  • 1/2 tsp lemon juice
  • 1/8 tsp cinnamon
  • 1/2 tsp cornstarch

For the biscuit topping:

  • 3 tbsp gluten free flour (I prefer Bob’s Red Mill Gluten-Free All-Purpose Flour, but any flour will work)
  • 3 tbsp oats
  • 1 tbsp Earth Balance
  • 1 tbsp maple syrup
  • 1 tbsp cashew milk (or your non-dairy milk of choice)
  • ¼ tsp baking powder

Instructions:

  1. Preheat oven to 375F
  2. Combine sliced peach, blueberries, lemon juice, cinnamon and cornstarch in a bowl and set aside
  3. In a separate bowl mix flour, oats, baking powder, maple syrup, Earth Balance and cashew milk until it is well combined.
  4. Evenly distribute the fruit filling between two small ramekins.
  5. Spoon the biscuit topping over the filling.
  6. Bake for 35 minutes, or until the cobbler topping is golden brown and the filling is bubbling.
  7. Enjoy!

Eggplant “Bacon” {gluten-free, vegan, dairy-free}

After going home for two weeks and buying all of my produce at local farmstands, I realized what I had been missing out on all summer by shopping at grocery stores. Not only is it great to support local farmers, but the food tastes exponentially better fresh off the farms, and it helps limit your carbon footprint by cutting down on the miles the food needs to travel to get to your fridge. Not to mention that you’ll know where your food comes from and, even if it’s not an organic farm, local farms are much less likely to use the extensive pesticides and chemicals that large scale commercial farms are using (or at least you can find out what they are using). Once I got back to Boston I immediately started searching for my best options for buying fresh local produce and decided on a weekly CSA box.

So much produce for only $22!

So much fresh, local produce for only $22!

My cooking routine has gotten a little monotonous recently, so I decided I was going to use these boxes as my own personal “Chopped” challenge. It’s given me a fun way to switch things up and experiment with new recipes, so get ready for a lot of CSA box inspired blog posts in the near future! First up was eggplant “bacon” because something about summer and farm-fresh tomatoes has been giving me major BLT cravings that desperately needed to be remedied.


Eggplant Bacon Strips

While I haven’t had bacon in over 5 years and the idea of most meats repulses me, there is still something alluring about the smell of sizzling bacon. Maybe it’s because I associate it with the smell of breakfast cooking on Christmas morning? Or maybe memories of bagel sandwiches from Bagel Buoy during high school? Something about it still draws me in, and it’s one of the few foods that I still miss since going vegan. But this eggplant bacon filled the house with a smoky delicious aroma that brought those memories flooding back, minus the animal cruelty, fat and cholesterol.

Crispy eggplant "bacon"

Eggplant is a food that I have always struggled to cook properly. Somehow it always either ends up too mushy, undercooked or burned, so I was a little nervous to see it in my CSA box. This recipe has drastically changed my view of it, and now I’m secretly hoping to see another eggplant in my box next Thursday, just so I can create more bacon-y goodness.The strips somehow ended up both crispy and slightly chewy, just like real bacon, and had that smoky, salty barbeque taste. A few slices of this bacon, paired with the fresh tomatoes and mizuna from my CSA box, a couple of slices of gluten-free bread and some Just Mayo and I had perfectly recreated a gluten-free, vegan version of a BLT.

Deconstructed BLT, with some extra crispy strips of eggplant

Deconstructed BLT, with some extra crispy strips of eggplant “bacon”

Recipe:

Ingredients:

  • 1 medium eggplant
  • 2 tbsp balsamic vinegar
  • 3 tbsp tamari (or soy sauce, if you’re ok with gluten)
  • 1 tbsp maple syrup
  • 1 tbsp olive oil (plus more for brushing)
  • 1 tsp liquid smoke
  • 1/2 tsp salt
  • 1/2 tsp paprika
  • 1/2 tsp black pepper
  • 1/8  tsp chili powder

Instructions: 

  1. Preheat oven to 425F.
  2. Remove the stem of the eggplant and quarter it lengthwise, making 4 even long, thin sections.
  3. Slice each piece of the eggplant lengthwise into thin strips. (*See note below* I used a mandolin, but this step can be done carefully by hand.)
  4. Arrange eggplant strips in a single layer on a paper towel and generously sprinkle with salt. Allow this to sit for at least 30 minutes. You’ll see the eggplant start to bead up with water. (The salt here helps to draw the water out of the eggplant, making it taste less bitter, and helping to prevent it from becoming soggy when cooking. – Clearly I’m putting my chemistry degree and my year working in an osmosis lab to good use here).
  5. After 30 minutes, rinse off the eggplant strips to remove the salt added in the previous step and allow the strips to dry on new paper towels.
  6. Brush each strip with olive oil, and arrange in a single layer on a well-greased pan (I used a silpat liner and it worked perfectly).
  7. Cook eggplant strips for 14 minutes, flipping half way through.
  8. Remove the strips from the oven and reduce the heat to 350F
  9. Allow the strips to cool while preparing the marinade.
  10. Prepare the marinade by combining balsamic vinegar, maple syrup, tamari, olive oil, liquid smoke, salt, paprika, black pepper and chili powder in a bowl.
  11. Line a cookie sheet with foil, and place a baking rack over it. (The foil is optional, but it certainly makes for an easier clean up).
  12. Dip each strip of eggplant in the marinade and place strips in a single layer on the baking rack.
  13. Bake at 350F for 12 more minutes, or until the strips are nice and crispy.(Cooking time will vary based on the thickness of your strips)
  14. Remove from the oven and allow to cool.
  15. Enjoy along side a tofu scramble, or a delicious BLT.

*When I first started prepping this recipe, I wasn’t exactly sure how thick I should cut the eggplant strips, so I cut half of the eggplant using the thick slice setting of the mandolin (1/4″) , and the other half using the thin slice setting (1/16″). I personally preferred the thinner sliced strips, because they better replicated the well-done extra crispy pieces of bacon that I used to claim at the breakfast table. The thicker slices were still delicious, just a little chewier, and more closely resembled the fattier, rare pieces of bacon that my brother always preferred.*

"E"LT

Peanut Butter and Roasted Banana Ice Cream {vegan, gluten-free, soy-free}

Peanut Butter Roasted Banana Vegan Ice Cream

A coconut milk peanut butter flavored ice cream base with roasted banana pieces and peanut butter ribbons.

While most people claim that they could never go vegan because they couldn’t give up cheese, my main hesitation always centered around ice cream. Growing up we had ice cream as our nightly dessert more often than not, and in the summer we were pretty much daily patrons of the ice cream man. The constant availability of “Lobster Tracks”, “Moose Tracks” and “Deer Tracks” ice cream at every meal once I got to Colby definitely didn’t help me kick the habit, and I never thought I’d be able to quit eating ice cream completely to go vegan. (Am I talking about ice cream like it is a drug? Maybe. But, hey, I really liked ice cream.

Peanut Butter Roasted Banana Vegan Ice Cream Cone

Luckily, despite popular belief, being vegan doesn’t mean giving up all the foods you’ve ever loved and eating exclusively kale salads and chia seeds (although, to be honest, I do eat my fair share of kale and chia).  There are vegan versions of pretty much every food and (for the most part) they are delicious. Grocery stores sell an amazing variety of vegan ice cream options and even Ben & Jerry’s is working on developing vegan flavors! The two main things that helped me adjust to the vegan ice cream life were getting an ice cream maker (thanks Jeff and Michelle!)  and the discovery of  FoMu, an all vegan ice cream parlor 10 minutes away from my apartment. In fact, FoMu may have made the transition a little too easy, since now I’ll pretty much eat there at any chance I can get.

The original FoMu version of Roasted Banana Peanut Butter ice cream (RIP).

RIP the original FoMu version of Roasted Banana Peanut Butter ice cream

Making vegan ice cream was the first time I actually thought through food science principles to develop a recipe. It was really interesting to be able to put my chemistry degree to good use and think through the interactions between the different ingredients. My original plan for this post was actually to talk about the science behind making a good vegan ice cream, but I bought a copy of Between the World and Me this morning and I can’t stop reading it long enough to type that up right now, so I’ll save that lesson for my next ice cream recipe.

Peanut butter ribbons ready to be folded into the ice cream

Homemade peanut butter ribbons ready to be folded into the ice cream

Roasted peanut butter banana was one of my favorite flavors at FoMu, but unfortunately they recently discontinued it. I was sad to think that I would never get to taste it again, so I pulled out my ice cream maker in an effort to recreate it at home. Banana and peanut butter is one of my go-to snacks and this ice cream pairs the two perfectly for a rich and creamy treat on these disgustingly hot and muggy days. It’s a peanut butter flavored base made with coconut milk, with chunks of oven roasted banana and peanut butter ribbons throughout. While I’ve thankfully moved past my ice cream a day habit, it’s always good to have a recipe in the vault for when the ice cream cravings hit hard.

Peanut Butter Roasted Banana Vegan Ice Cream

Recipe:

Ingredients:
   For the Peanut Butter Ice Cream Base: 
  • 1 can coconut cream**
  • 1 can coconut milk
  • 1 cup creamy peanut butter
  • 3/4 cup sugar
  • 2 tsp vanilla extract
  • 1/4 tsp xanthan gum
  • 1/4 tsp salt

**Coconut cream is a thicker, higher fat variety of coconut milk. It’s essentially a can of only the thick part of the coconut milk that usually settles to the top of the can. This is different than cream of coconut, which is a sweetened version used for drinks like piña coladas and will not work in this recipe. If you are unable to find coconut cream, you can just use a second can of coconut milk instead**

   For the Peanut Butter Ribbons:
  • 1/4 cup creamy peanut butter
  • 1/2 tbsp coconut oil
  • 1/2 tbsp powdered sugar
   For the Roasted Banana Pieces
  • 1 banana, peeled and halved lengthwise
  • coconut oil, for drizzling

Instructions:

  1. Combine the coconut milk and coconut cream in a saucepan over low heat and gently whisk until the fat and liquid are combined.
  2. Add in xanthan gum, sugar, vanilla and salt and continue to whisk until the mixture starts to thicken slightly.
  3. Remove from heat and carefully poor the mixture into a blender and blend for 30 seconds. **This step is optional, but I really think it helps to develop a creamier consistency**
  4. Pour into a bowl and refrigerate for 2-4 hours. While it is chilling you can prepare the roasted bananas and peanut butter ribbons:
 For the peanut butter ribbons: 

1. Combine peanut butter, coconut oil and powdered sugar in a small sauce pan.

2. Stir well over low heat until thoroughly combined.

3. Pour mixture onto a piece of parchment paper and place in the freezer

4. After around 15 minutes, remove it from the freezer and slice it into smaller 1-2″ pieces

5. Leave the pieces in the freezer until adding into the ice cream

For the roasted banana pieces

1. Place the halved bananas on a baking sheet

2. Drizzle lightly with coconut oil

3. Bake at 400F for 15-20 minutes

4. Remove from oven and cut into smaller 1″ pieces

5. Remove from the refrigerator and stir briefly. The mixture will be very thick, almost a pudding consistency and stirring it will help break that up into more of a heavy cream consistency.

6. Pour the mixture into your ice cream maker and follow the manufacturers instructions, for mine it takes around 20-25 minutes to reach the right consistency.

7. Once the ice cream is approaching its desired consistency slowly add in the peanut butter ribbons and roasted banana pieces and allow the churning of the ice cream maker to distribute them throughout the ice cream.

8. Depending on your ice cream maker and how long you churn it for, you may want to freeze the ice cream for a little longer until it reaches a more solid consistency.

9. If you don’t devour it in one sitting, store the ice cream in an air tight container to prevent the development of ice crystals. This ice cream tends to get very hard when it sits in the freezer, so be sure to give it ample time to thaw (or microwave it for a few seconds at low power) before scooping it.

Rhubarb Crisp {vegan, gluten-free, soy-free}

A few weeks ago my friends and I went up to Oaks Head, Maine to spend the weekend at a house on the ocean that Zoe’s parents were renting. It was a perfect Maine weekend complete with good friends, hiking, beautiful views, and a barbecue on the water. It was so nice to get out of the city, and really made me miss the summers I spent in Maine working on the lakes.

Jamie and I were really exited about our hike up Maiden's Cliff. Zoe and Lauren missed the memo.

Just really exited about our hike up Maiden’s Cliff.

As care packages full of “crack brownies” and lemon bread over the past seven years have taught me, Zoe’s mom is a great cook. While I showed up with my usual arsenal of gluten-free vegan snacks, her parents did an amazing job of making sure I had more than enough to eat.  The only thing I wasn’t able to eat was her famous rhubarb crisp, and it looked and smelled so good that I decided on the spot that I’d have to re-create a vegan, gluten-free version of my own to see what I was missing out on.

Despite what I thought as a kid, rhubarb is not just red celery.

Despite what I thought as a kid, rhubarb is not just red celery.

Before making this recipe I had never had rhubarb crisp before. Actually, I had never had any form of rhubarb before in my life. Up until last year, I didn’t even really know what it was, and am slightly embarrassed to admit that when I was little I thought it was just fancy red celery. But, after that weekend I was determined to branch out and give it a try and I am beyond happy that I did.

I swear there is rhubarb underneath all of that topping!

I swear there is rhubarb underneath all of that topping!

The crisp was perfectly tart with a hint of sweetness and a crunchy oat streusel topping. I served it warm with a scoop of vegan ice cream, and I was in heaven. While I’m sure I’ll never be able to rival Zoe’s mom’s recipe, I was thrilled with the result. In an effort to stop myself from eating all four I gave some away to my friend, and apparently multiple people stopped her on her walk home to comment on how delicious it looked! This definitely is a great way to sneak more vegetables into your day (even though theres a little sugar mixed in). It makes a delicious dessert, or you can skip the ice cream and have it for breakfast (or don’t skip the ice cream and treat yo’ self, no judgements). Does anyone have any other favorite ways to cook rhubarb? I’m so curious to learn what I’ve been missing out on all these years!

Recipe: 

Ingredients: 

For the rhubarb filling:

  • 2.5 cups rhubarb, cut into 1/2 inch pieces
  • 1/2 cup sugar
  • 1.5 tbsp corn starch
  • 1 tbsp orange zest
  • 1 tbsp fresh orange juice
  • 3 tbsp gluten free flour ( I used 1 tbsp almond flour and 2 tbsp of oat flour, but it’s really just for thickening and any gluten free flour will work)

For the oat topping:

  • 3/4 cup gluten-free oats
  • 1/4 cup melted coconut oil
  • 1/2 tsp cinnamon
  • 1/4 cup brown sugar
  • 1/4 cup oat flour (again, really any gluten-free flour of your choice will work)
  • 2 tbsp maple syrup
  • 1/4 cup walnut pieces (optional)

Instructions: 

  1. Preheat oven to 375F
  2. Place chopped rhubarb in a large mixing bowl and toss with sugar, corn starch, orange juice, orange zest and flour until rhubarb pieces are well coated
  3. In a separate mixing bowl combine the oats, coconut oil, cinnamon, brown sugar, flour, maple syrup and walnuts until well mixed
  4. Transfer rhubarb filling into a baking dish (I made mine in 4 individual ramekins, but it could just as easily be made in one 8″ x 8″ baking dish)
  5. Spoon the oat topping on top of the rhubarb filling, making sure to coat it evenly
  6. Bake for 30 minutes, or until topping has turned a nice golden brown and the filling is bubbling around the edges
  7. Allow to cool slightly, serve with a scoop of your favorite vegan ice cream, and enjoy!